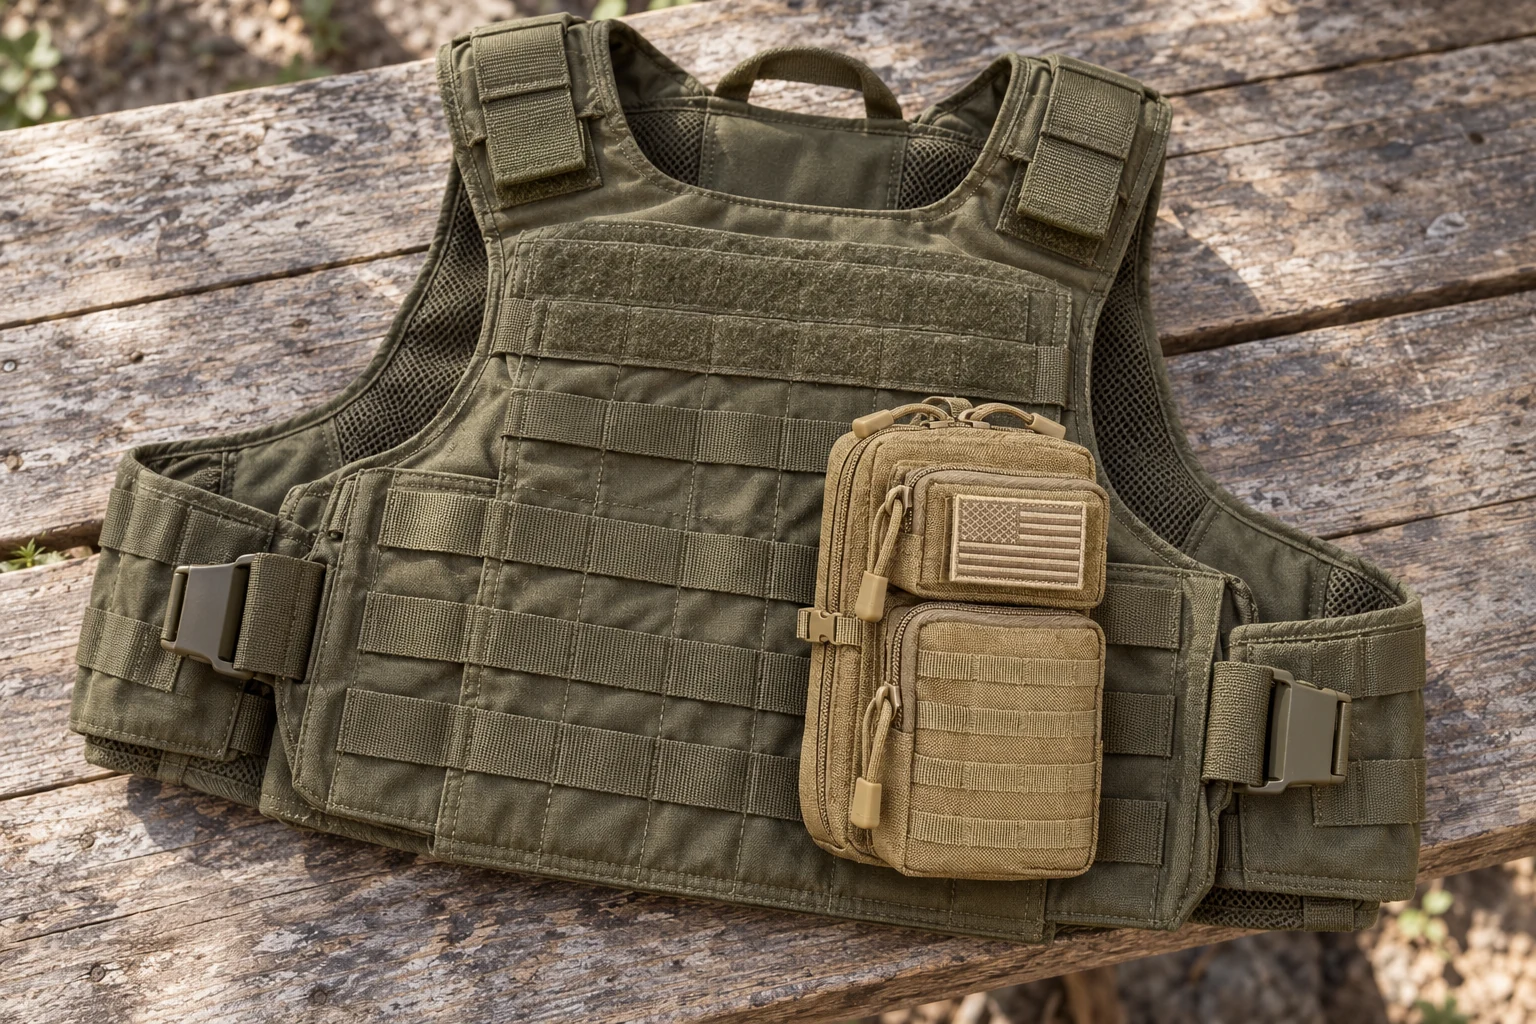
The short answer
Use the full alternating weave—not a straight drop behind the vest webbing. Start with an empty pouch. Align its rear attachment straps with open PALS columns on the vest. Pass each strap through one vest row, return it through the next row on the pouch back, and keep alternating until the designed attachment length is used. Pull out slack after each pass and secure the final ends.
Then load the pouch modestly and check whether it lifts, twists, sags, or blocks normal movement. If the vest panel folds, the pouch covers an opening or adjustment point, or the straps cannot reach their final closure, choose another position or another mounting method.
| Check | What you want | Warning sign |
|---|---|---|
| Vest surface | Repeated PALS rows or compatible slots with enough open height and width | Decorative loops, hook-and-loop only, or interrupted rows |
| Pouch back | Rear straps, sticks, or clips designed to weave through a carrier | Only front webbing, a grab loop, or no clear rear hardware |
| Final weave | Alternating passes through vest and pouch with both ends locked | Straps run straight down, skip rows, twist, or remain open |
| Loaded fit | Pouch stays close and the vest panel remains flat | Pouch bounces, pulls the panel outward, or blocks movement |
Confirm the vest and pouch are compatible
PALS is the ladder-like grid of horizontal webbing used as the attachment surface. MOLLE is the broader load-carrying system that commonly uses that grid. Shopping pages often use the two names as if they mean the same thing, so inspect the actual surfaces instead of relying on the label.
- Count usable rows. A tall pouch needs enough vertical rows to use its designed strap length.
- Check the columns. Rear straps should line up with open channels instead of pulling diagonally.
- Inspect both sides. Front MOLLE-style webbing does not prove that the pouch has rear mounting straps.
- Check the closure. Snaps, tuck tabs, hook-and-loop ends, or clips must reach their locked position.
If the pouch and carrier cannot form a complete weave, do not force them together with cord, a loose carabiner, or one partly closed strap. Our guide to using a MOLLE pouch without compatible webbing covers safer alternatives.
Choose the position before you weave
Place the empty pouch against the vest and test the location first. A technically compatible area can still be a poor choice if it interferes with the front opening, side adjustment, shoulder movement, a backpack strap, or comfortable sitting.
- Keep closures clear. Do not cover zippers, buckles, hook-and-loop flaps, or quick adjustments.
- Protect your reach. You should be able to open the pouch without twisting hard or looking down for a long time.
- Leave room to move. Raise both arms, bend, turn, and sit before committing to the position.
- Check other equipment. A backpack shoulder strap or vehicle seat belt should not press directly across a hard, loaded pouch.
For general organization, a compact pouch often works better than a tall, overloaded one. The EDC pouch size guide explains why loaded thickness matters as much as the outside height and width.
How to weave a MOLLE pouch onto a vest
- Empty the pouch. A flat, light pouch is easier to align and weave.
- Open the rear straps. Lay them straight and remove any twists.
- Align the top edge. Hold the pouch against the chosen columns and confirm that the bottom ends can reach a final usable row.
- Pass through the first vest row. Feed each strap behind the top compatible webbing row or through the matching slot.
- Return through the pouch. Bring each strap back through the next horizontal channel on the pouch itself.
- Alternate one row at a time. Continue vest, pouch, vest, pouch. Pull the slack out evenly after every pass.
- Secure the ends. Close the snaps, tuck tabs, clips, or hook-and-loop exactly as their maker intended.
- Check the back of the panel. Make sure no strap is twisted, bunched, or pressing across an adjustment path.
This is the same basic interwoven connection used when you attach a MOLLE pouch to a backpack or a compatible belt. The carrier shape changes, but alternating between the carrier and pouch rows is what keeps the two surfaces close together.
Load for balance, not maximum capacity
Add the normal contents only after the empty mount passes inspection. Put denser items close to the vest side and lower in the pouch. Use internal pockets or elastic where available so a flashlight, cable, power bank, keys, small first-aid packet, pen, or compact tool does not collect in one outside corner.
A vest-mounted organizer should not become a catch-all. If filling it makes the front panel bow outward, shifts the vest to one side, makes the zipper hard to close, or creates a pressure point, remove items. A work bag, truck kit, or backpack may be the better place for backups that do not need immediate access.
Run a six-point fit test
- Lift: pull the pouch gently upward; the straps should stay inside their rows.
- Twist: rotate it lightly; small fabric movement is normal, free rotation is not.
- Open: use the zipper with one hand without pulling the whole panel forward.
- Move: raise your arms, bend, turn, walk, and sit.
- Layer: put on any jacket or backpack normally used with the vest and check for rubbing.
- Inspect: look for skipped rows, open ends, stressed stitching, sharp contents, or a folded panel.
Repeat the test after the first real use and whenever the load changes. Fabric settles, and a heavier item can expose movement that an empty test misses.
Common MOLLE vest mounting mistakes
Running straps straight down behind the carrier
This leaves the pouch hanging from a few contact points. Return through the pouch after every carrier row so the connection becomes one tight weave.
Using only the first and last rows
Skipping the middle rows creates slack and lets the pouch rock outward. Use every compatible row intended by the attachment design.
Mounting first, testing later
A pouch can look centered while blocking a closure or shoulder strap. Test the empty position before spending time on the full weave.
Overloading a small panel
A secure weave cannot fix poor weight placement. Reduce the load if the vest shifts, folds, or becomes uncomfortable.
Where a CobaltNook pouch fits
The CobaltNook Tactical MOLLE Organizer Pouch uses a compact zippered layout and front webbing for small everyday gear. It is offered for mixed-use kits such as cables, chargers, keys, flashlights, small tools, and first-aid basics. Before mounting any pouch, inspect the rear hardware actually supplied and compare it with the vest webbing you plan to use.
The current product page lists a two-pouch Core Loadout in one selected color and a four-pouch Full Loadout made from two selected pouch pairs. A two-pouch setup can keep one organizer in a work bag, truck, or travel kit while the other serves as a removable vest or backpack organizer when the mounting surfaces are compatible. Check the current product page for live details.
Frequently asked questions
Can every pouch attach to a MOLLE vest?
No. The vest needs compatible PALS rows and the pouch needs rear straps, sticks, or clips designed to interweave with them. Front webbing alone does not prove that the pouch can mount to a vest.
Where should a MOLLE pouch sit on a vest?
Put it where you can reach it without blocking the front opening, shoulder movement, side adjustment, or anything needed for normal sitting and bending. Test the empty pouch before loading it.
Do MOLLE straps go straight behind the vest webbing?
No. They should normally alternate between a row on the vest and a row on the back of the pouch. A straight drop behind the carrier leaves more movement and does not create the intended interwoven connection.
How do I stop a MOLLE pouch from bouncing?
Use every compatible row, remove slack after each pass, secure both ends, and keep the load modest and balanced. Move or unload the pouch if the vest panel folds or the pouch still lifts and twists.
Bottom line
Choose an open PALS area, weave through every compatible row, secure both ends, and test the loaded pouch while moving. A good mount keeps the pouch close without folding the vest, blocking adjustments, or creating a pressure point. If the connection is incomplete or the load changes how the vest fits, reposition it or carry less.
Sources and further reading
- 5.11 Tactical: How Does MOLLE Work? — overview of PALS surfaces and alternating attachment.
- Zentauron: How to Attach MOLLE/PALS Pouches — illustrated row-by-row weaving sequence.