The short answer
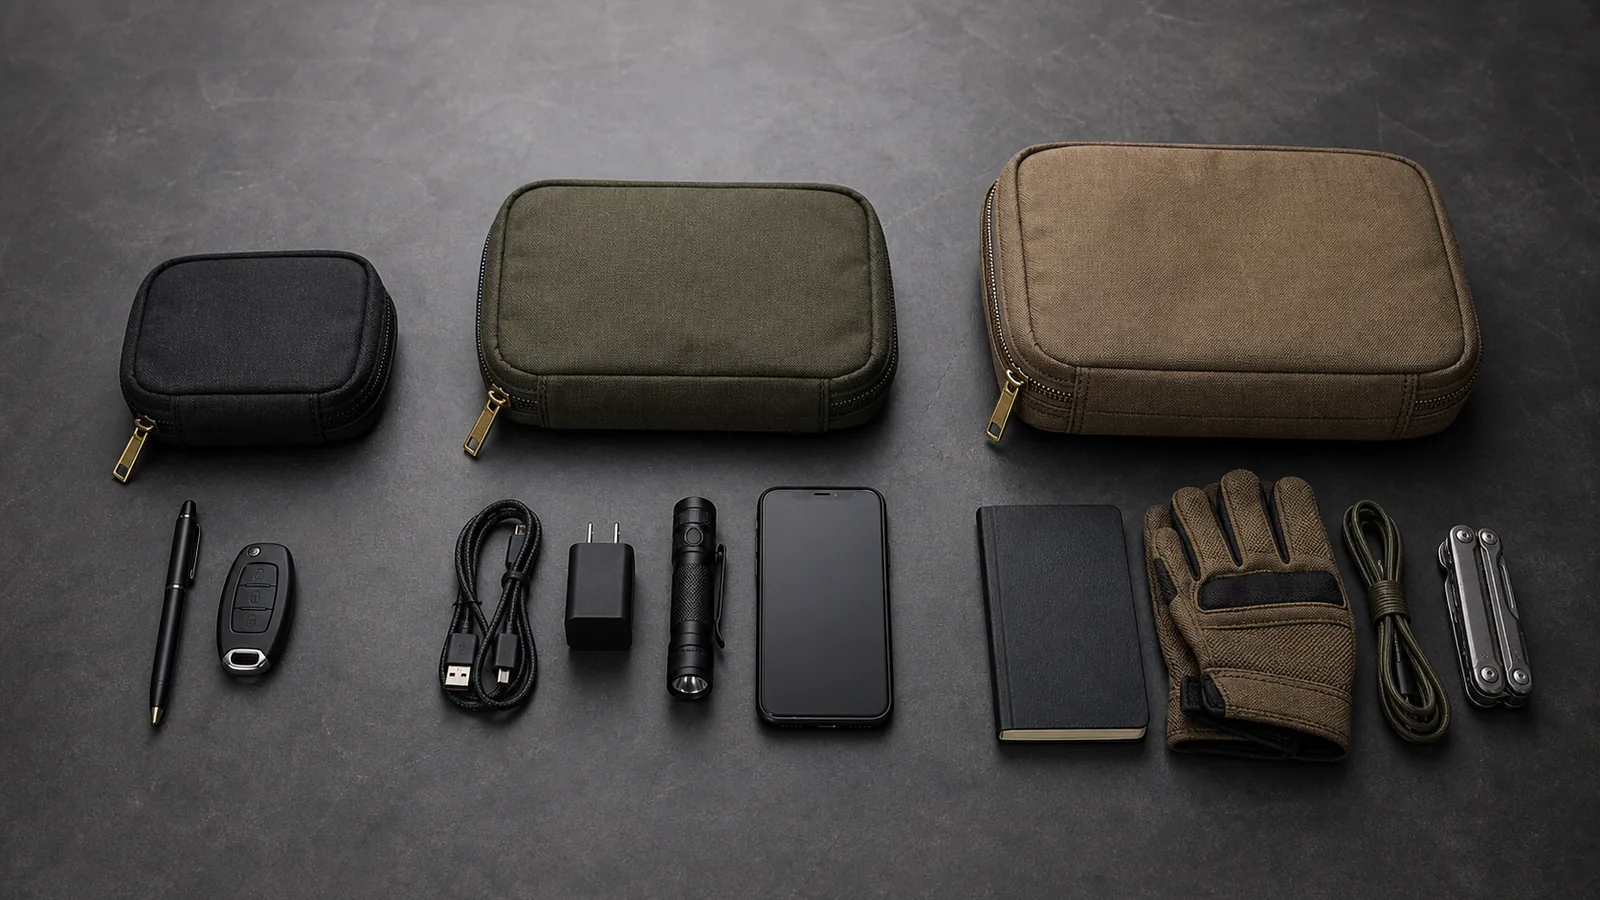
There is no universal “right” EDC pouch size. The right size is the smallest one that holds the items for one clear job, keeps them reachable, closes without strain, and still fits the bag, pocket, belt, truck compartment, or camp setup where it will live.
Start with the contents, not a product label. A compact organizer may be enough for a pen, key accessory, small light, and one cable. A bag-based daily kit may need room for a charger, phone-sized item, cable bundle, notebook, or compact tool. A vehicle or outdoor kit may need a larger pouch—or several smaller, clearly separated pouches—because one oversized catch-all becomes difficult to inspect and reset.
Published size names are only rough guides. Maxpedition’s current pocket-organizer chart, for example, spans product-specific external sizes from 3.5 × 1 × 5.5 inches to 7 × 3 × 9 inches across “Micro,” “Mini,” standard, “Fatty,” “Beefy,” and “Chubby” models. The useful lesson is not that every brand uses those categories. It is that height, width, and loaded depth can change independently, so “medium” does not tell you whether your longest or thickest item will fit.
Quick size decision
| Starting size | Typical job | What usually limits it | Where it should live |
|---|---|---|---|
| Compact | Lean essentials, key accessories, pen, small light, short cable | Longest item and pocket comfort | Trouser or jacket pocket, small inner pocket |
| Medium | Daily electronics, charger, cable set, phone-sized essentials, small tools | Loaded thickness and access to the center | Work bag, backpack, personal-item bag |
| Larger | Work tools, outdoor support gear, vehicle module, grouped accessories | Host-bag space, weight, and whether items stay visible | Truck, camp bag, larger backpack, garage or work kit |
| Two smaller pouches | Two different jobs that should not mix | Whether each kit can stand alone | Separate carry zones or transfer kits |
A recent Heinnie Haynes sizing guide uses under 13 cm, 13–20 cm, and over 20 cm as practical compact, medium, and large height bands. Treat those as one retailer’s useful rule of thumb, not an industry standard. Your limiting item, the pouch opening, and loaded thickness matter more than the category name.
How to choose your pouch in six steps
1. Give the pouch one job
Write one sentence: “daily charging kit,” “small truck tools,” “desk-and-meeting essentials,” or “dry camp repair items.” If two unrelated jobs appear in that sentence, split them. A pouch sized for every possible task will usually be too large for the task you perform most often.
This job-first rule also improves organization. Our EDC pouch layout guide shows how to group gear by access and return every item to a fixed place. Size is part of that system: the pouch should support the layout instead of forcing several layers of loose items.
2. Lay out the exact gear
Use the items you actually carry, not a wish list. Remove duplicates, empty packaging, and “maybe someday” objects. Put the most-used items together and occasional items to one side. This physical audit is also the first step recommended in the Heinnie guide because it reveals the real footprint before a pouch is chosen.
For an outdoor kit, tailor the load to the activity rather than trying to fit every emergency category into one organizer. The U.S. National Park Service’s Ten Essentials guidance says additional items depend on the activity and identifies separate systems such as navigation, illumination, first aid, repair tools, hydration, and shelter. That supports modular planning: a small repair pouch can have one role while water, clothing, and shelter live elsewhere.
3. Find the limiting item
Identify the longest, widest, and thickest objects. They may be three different items. A tall pouch can still fail if its opening is narrow; a wide pouch can still bulge if a charger and cable overlap; a slim organizer can fit a tool’s outline but not its handle thickness.
Measure rigid items first. Fabric and cables can flex, but a phone, notebook, wall charger, compact tool, battery case, or hard container defines the minimum usable space. Compare those measurements with the maker’s stated dimensions and photos of the internal layout. External dimensions are not the same as usable interior dimensions, so do not plan a zero-clearance fit.
4. Account for loaded thickness
Many pouches look compact while empty and become awkward after the center fills. Stack the intended contents as they would sit behind loops and pockets. If two hard items occupy the same layer, the pouch may bow outward, press against zipper teeth, or become uncomfortable against your body.
A good fit closes with one hand and without compressing fragile gear. The front pocket should remain usable, the main zipper should follow its normal path, and the loaded pouch should lie flat enough for its carry location. If the zipper needs force, move the lowest-use item elsewhere rather than buying around clutter.
5. Measure the place where the pouch will live
The host location sets a second size limit. Measure the bag pocket, laptop-compartment clearance, glove box, seat-back panel, drawer, or belt area—not just the empty main compartment. Leave access to the bag’s own zipper, bottle pocket, handle, and other frequently used gear.
For a work bag, compare the pouch against our EDC pouch versus bag organizer insert guide. An insert is often better when the whole bag needs structure; a pouch is better when one grouped kit must move between bags. For a carry-on, the personal-item pouch guide explains why in-transit essentials need a fixed, reachable zone rather than the biggest possible organizer.
6. Test access, not only capacity
Load the proposed setup, close the pouch, place it in its normal location, and retrieve the three most-used items. You should not need to remove several objects to reach one cable or tool. Then return each item and close the pouch again. A pouch that technically holds everything but cannot be reset quickly is too crowded or poorly laid out.
If you are buying online, make a paper or cardboard rectangle using the stated external footprint and compare it with the carry location. Add the expected depth with folded cardboard or a small box. This mock-up will not reproduce internal pockets, but it can reveal a pouch that blocks a zipper, crowds a laptop sleeve, or feels too large for a pocket.
Choose size by carry location
Pocket or jacket carry
Keep the kit lean and flat. Choose only the items that must move with you when the larger bag stays behind. A compact pouch should not pull the pocket out of shape, press hard against your leg, or need to be removed every time you sit. If you need a phone, large power bank, notebook, and several tools, the setup has outgrown pocket carry even if a zipper can be forced around it.
Work bag or laptop backpack
A medium pouch often works because the bag carries the weight while the pouch groups small objects. Prioritize loaded thickness so the organizer does not press into a laptop or consume the entire document space. Our EDC pouch versus tech pouch comparison helps if most of the contents are electronics and cable management is the main job.
Truck or vehicle kit
Choose a size that fits a fixed compartment or anchored organizer and remains easy to identify. Do not let a general pouch hide required emergency equipment. Use separate modules when the jobs differ: one for everyday cables and small tools, another clearly identified kit for emergency or first-aid supplies. The EDC pouch versus first-aid kit guide explains why those roles should stay distinct, while the truck-kit setup guide covers a practical vehicle layout.
Camping or outdoor use
Size the pouch around one support system, such as repair items, lighting accessories, or navigation backups. Do not treat a large organizer as a substitute for a complete trip plan. The pouch must also fit the pack after water, clothing, food, and shelter are accounted for. For attachment and use ideas, see the MOLLE pouch camping and travel guide.
Carry-on or personal-item travel
Choose a pouch that can be removed at the seat or security area without unpacking the whole bag. Keep liquids and restricted items in the formats required for the trip rather than assuming one EDC pouch changes those rules. A slim electronics-and-documents kit may be more useful than a deep pouch that consumes limited under-seat space. Our air-travel EDC guide covers contents and screening considerations separately.
When two smaller pouches beat one large pouch
Use two pouches when the items have different destinations, access patterns, or maintenance needs. A work electronics kit may move between home and office, while a truck-tool pouch stays in the vehicle. Combining them creates dead weight and makes both jobs slower.
- Split by job: electronics in one pouch, tools in another.
- Split by location: personal-item essentials with you, vehicle gear in the truck.
- Split by urgency: everyday items separate from clearly marked emergency supplies.
- Split by transfer: move only the module needed for that bag or trip.
Multiple pouches are not automatically better. If both contain duplicates or neither has a fixed job, you have multiplied the clutter. Keep an inventory and reset each pouch after use.
Five sizing mistakes to avoid
- Buying by the word “medium.” Compare actual dimensions, opening, layout, and depth because brand labels are not standardized.
- Measuring only empty gear outlines. Loaded thickness and overlapping hard items often cause the real fit problem.
- Filling every pocket on day one. Empty space for access is useful; empty space for future clutter is not.
- Ignoring the host bag. A pouch can fit the contents and still block a laptop sleeve, zipper, bottle pocket, or handle.
- Using one pouch for unrelated roles. A catch-all hides critical items and becomes harder to inspect, maintain, and transfer.
How the current CobaltNook pouch fits this method
The live CobaltNook Tactical MOLLE Organizer Pouch page describes an open main compartment, front zip pockets, and MOLLE webbing for organizing customer-supplied phone-sized essentials and loose small gear. The current Core Loadout contains two pouches, while the Full Loadout contains four. That makes it possible to give different carry zones separate jobs instead of forcing one pouch to serve a work bag, truck, camp kit, and travel setup at once.
Use the same sizing test before ordering: define the job, measure the rigid items, compare the loaded footprint with the intended carry location, and keep enough access room for the zipper and pockets to work normally. If a specific rigid object must fit, confirm its measurements against the current product information rather than relying on the general word “compact.”
Frequently asked questions
What size EDC pouch is best for daily carry?
The best daily-carry size is the smallest pouch that holds your actual list without forcing the zipper, burying frequently used items, or becoming awkward in its normal carry location. Pocket carry usually needs a compact organizer; bag-based daily carry can use a larger footprint if it still fits a fixed place inside the bag.
Should an EDC pouch be bigger than the gear inside it?
It needs enough room for the gear to sit in usable positions and for the zipper to close without pressure, but large unused space lets items shift and encourages overpacking. Choose access clearance rather than empty capacity for its own sake.
Does a phone need to fit inside an EDC pouch?
Only if protecting or grouping the phone is part of the pouch’s job. If the phone already has a dedicated pocket, size the pouch around the smaller items that otherwise disappear, such as cables, keys, a compact light, charger, or small tools.
Is one large EDC pouch better than two small pouches?
Not always. Two smaller pouches can separate jobs, such as work electronics and truck tools, and let you move only the kit you need. One larger pouch is simpler when all the items support the same task and remain easy to see and reach.
How do you test EDC pouch size before buying?
Lay out the exact gear, measure the longest and thickest items, compare them with the maker’s dimensions and internal layout, then check the space where the loaded pouch will live. A paper or cardboard footprint can reveal whether the pouch will block other gear or make a pocket too tight.
Bottom line
Choose your EDC pouch from the contents outward and the carry location inward. The contents set the minimum length, width, opening, and depth. The pocket, bag, belt, truck compartment, or outdoor kit sets the maximum loaded footprint.
If the pouch closes without pressure, keeps frequent items visible, fits one fixed location, and can be reset quickly, the size is working. If you must dig, force the zipper, block the host bag, or carry unrelated gear, remove items, split the job, or choose a different size.
Sources and further reading
- Maxpedition: E.D.C. Pocket Organizer Size Chart — first-party examples showing how organizer height, width, and depth vary across named sizes.
- Heinnie Haynes: How to Choose an EDC Pouch — current practical guidance on auditing gear, size bands, layout, and carry comfort.
- U.S. National Park Service: Ten Essentials — official trip-planning guidance supporting activity-specific and system-based outdoor packing.
- CobaltNook Tactical MOLLE Organizer Pouches — current product layout, use cases, and set details referenced above.