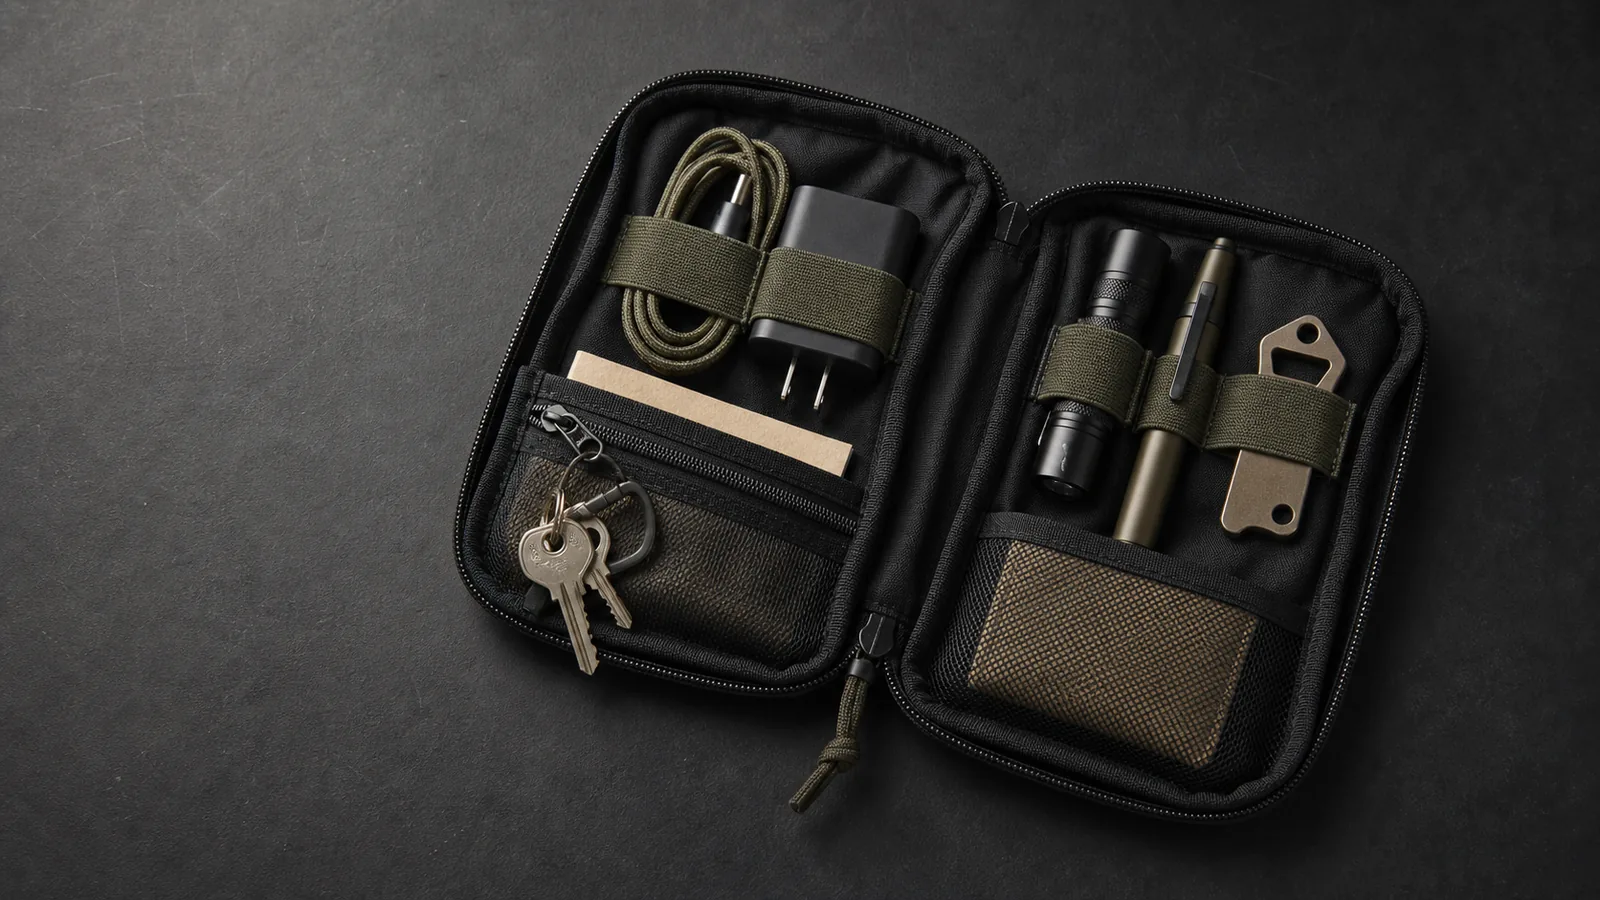
The short answer
The best EDC pouch layout is not the one that holds the most gear. It is the one that lets you identify, reach, and return each item without digging. Start by deciding what the pouch is for: daily work, truck essentials, a travel transfer kit, or a compact camp setup. Then organize only the items that support that job.
A pouch becomes messy when it acts as a catch-all. Chargers, receipts, spare hardware, loose batteries, keys, and “just in case” tools collect until the zipper closes under pressure. A better system uses a small number of zones: quick access, protected essentials, grouped tools or electronics, and a clear area for anything that must remain visible.
If the category is new to you, read what an EDC pouch is and when it helps first, then use our practical EDC pouch checklist. Next, use the EDC pouch size guide to match the gear list, loaded thickness, and carry location. The pouch should simplify a larger bag, truck, or work setup—not become another container you have to search.
Give the pouch one job before choosing the items
Write one sentence that describes the pouch: “the things I need at my desk and between meetings,” “small truck items that otherwise roll around,” or “the dry travel essentials I move between bags.” That sentence is the filter for every item.
Two questions keep the load practical:
- What task does this item solve? A cable used every day has a clear role. A third adapter for a device you are not carrying does not.
- Where would I look for it first? If the answer is not this pouch, the item probably belongs somewhere else.
Carryology’s guide to organizing an EDC bag makes the same broad case for modular organization: smaller organizers improve access, reduce loose-item clutter, and make a setup easier to transfer between bags. That transfer benefit is useful only when the pouch remains understandable; a random collection simply moves the mess.
Use a four-zone layout
| Zone | What belongs there | What to avoid |
|---|---|---|
| Quick access | Flat, light items used often: a short cable, note card, pen, or small key accessory. | Bulky objects that bow the front pocket or cover the main zipper. |
| Secured loops | Long or cylindrical items that fit without strain, such as a compact flashlight or pen. | Forcing oversized tools into elastic or placing hard edges against fragile gear. |
| Main compartment | Grouped items for the pouch’s main job: charging pieces, compact work accessories, or small truck gear. | Loose tangles, duplicate adapters, and objects stacked so deeply that the bottom disappears. |
| Separate safety kit | Clearly identified first-aid or emergency supplies maintained for that purpose. | Mixing time-sensitive or safety-critical supplies into an unlabeled electronics pouch. |
The zones are a decision tool, not a demand to fill every pocket. A front pocket can stay partly empty. An elastic loop can stay unused. Empty space makes it easier to see what is present, return items to the same place, and notice when something is missing.
A seven-step EDC pouch setup
- Empty the pouch completely. Remove wrappers, old receipts, duplicates, and items that migrated from another bag.
- Group the proposed load by function. Put charging gear together, writing tools together, keys together, and any compact work tools together.
- Choose the daily-reach items. These earn the front pocket or the most open loop. Frequency matters more than appearance.
- Control cables before packing them. Coil each cable loosely and use a reusable tie if needed. Carryology notes that ties help stop cords from creating general carry clutter.
- Place weight low and near the back. A compact adapter or small metal tool should not sit at the outer edge where it makes the pouch flop, pull away from a bag, or press into lighter items.
- Close the pouch without squeezing it. The zipper should travel normally. If you need to compress the sides by hand, remove the lowest-use item.
- Run a retrieval test. Reach for the three items used most, one at a time, then return them. If each retrieval disturbs the rest of the pouch, change the layout.
A Pack Config contributor’s compact EDC example shows why pocket choice matters: the writer chose a pouch with a main zipper, internal mesh pockets, and a front zip pocket because those features made a small set easier to access and organize. The exact loadout was personal, but the useful principle is general—match the pouch layout to the job, rather than copying another person’s item list.
Pack by access, not by perfect symmetry
Put first-use items where the pouch first opens
If the pouch lives in a work bag, the charging cable or access card may matter before anything else. If it lives in a truck, a tire gauge, flashlight, or pen may deserve the first visible position. Keep the first-use item close to the opening instead of burying it under a visually balanced row.
Protect items from each other
Hard metal edges should not press against a phone, power bank, memory card, or other scratch-sensitive item. Use separate pockets when available, keep covers on pointed tools, and do not treat fabric dividers as impact protection they were not designed to provide.
Keep the zipper path clear
Loose cable ends, key rings, and fabric tabs can catch in a zipper. After loading, trace the zipper path with a finger and tuck anything that reaches it. A pouch that closes cleanly at home is less likely to jam when opened quickly inside a larger bag.
Adjust the layout for where the pouch lives
Work-bag pouch
Focus on the small items that move between desks or rooms: one charging cable, the correct adapter, a pen, a small note card, and any access accessory actually used. Keep bulky headphones, a large mouse, or a laptop charger in the larger bag when they make the pouch hard to use. Our work-bag pouch guide shows how one contained kit stops small gear from spreading across every pocket.
Truck pouch
Choose compact items that support routine roadside or vehicle tasks, then keep a full emergency kit and first-aid kit separate and clearly identified. A general organizer is not a substitute for properly selected safety equipment. For a practical starting point, see the truck-kit pouch setup and the guide to separating an EDC pouch from a first-aid kit.
Travel transfer pouch
Use the pouch for dry essentials that need to move between a carry-on, personal-item bag, and day bag. Keep liquids and any screened or restricted items in the format required for the trip rather than assuming that being inside a pouch changes the rules. Our air-travel EDC guide explains the separation, while the personal-item setup focuses on access during transit.
Camp or range-support pouch
Build around the activity instead of copying a social-media loadout. A light, writing tool, small repair item, and a few dry accessories may fit; food, liquids, medical supplies, and activity-specific safety gear should use their own appropriate storage. The MOLLE pouch camping guide covers repeatable placement without treating one pouch as an entire field kit.
How to prevent overfilling
Overfilling usually starts with duplicates and category drift. A work pouch gains a spare truck item; a travel pouch gains a tool that never leaves home; a cable kit collects adapters for devices no longer carried. Use these limits:
- One working item before one backup. Add a spare only when the consequence of failure justifies the space.
- One cable per active connection. Do not carry several versions “just in case” without checking the devices in the bag.
- No mystery items. If you cannot name the task, destination, or device, remove it.
- No zipper pressure. A stressed pouch is harder to inspect and can put unnecessary force on the closure.
- No hidden bottom layer. If items disappear beneath other items, split the load or use a different organizer.
If the pouch is mainly carrying flat pens, cards, and a notebook, an admin pouch may fit better. If the load is dominated by hand tools, compare an EDC pouch with a tool roll rather than forcing tool-shaped gear into a general organizer.
The two-minute access test
- Close the pouch and place it where it normally lives.
- Retrieve the item used most without removing unrelated gear.
- Retrieve the heaviest item and check whether the remaining load collapses.
- Return both items to their original places without looking for a new gap.
- Shake or carry the closed pouch briefly, reopen it, and confirm the layout remains understandable.
Pass the test only if the pouch closes cleanly, the frequent items are obvious, and the load can be reset. A layout that works only for a photograph will become a loose pile after the first busy day.
Reset the pouch on a simple schedule
Do a quick reset after a trip, vehicle repair, busy workweek, or any event that changes the load. Remove trash, return borrowed items, check cables for damage, and confirm that keys, batteries, or other small pieces did not migrate into the wrong pocket. A monthly check is a useful default for a daily pouch, while an emergency or first-aid kit should follow the inspection needs of its own contents.
When changing bags, move the whole pouch first, then ask whether its job changed. Carryology highlights transferability as a benefit of small organizers, but the new bag may have different built-in pockets or access. Do not duplicate what the larger bag already handles well. The pouch vs. bag-organizer comparison explains when a removable module is better than a panel that shapes the entire bag.
How the current CobaltNook pouch fits this method
The current CobaltNook Tactical MOLLE Organizer Pouch uses an open main compartment, front zip pockets, and MOLLE webbing. The live offer is sold as pouch sets intended for customers to load with their own phone-sized essentials, cables, keys, compact tools, and small gear. Sample gear shown on the product page is illustrative, not included.
That layout supports the zone method: front pockets for small frequent items, the main compartment for the pouch’s primary group, and webbing for compatible carry setups. Use only the features that improve the real routine. A second pouch is most useful when it has a different, clearly named job—not when it duplicates the first one without a reason.
Frequently asked questions
What is the best way to organize an EDC pouch?
Give the pouch one job, group items by function, and place the most frequently used items in the easiest pocket or loop. Keep heavier items low and close to the back of the pouch, then test whether every item can be reached without emptying the kit.
What should go in the front pocket of an EDC pouch?
Use the front pocket for flat, light items reached often, such as a short charging cable, note card, pen refill, or small key accessory. Avoid overfilling it with bulky or sharp objects that make the pocket bow outward or hide the main zipper.
How do you keep an EDC pouch from getting overfilled?
Start with the tasks the pouch must solve, remove duplicates, and require every item to have a specific place. If the zipper needs pressure, the pouch will not lie flat, or one item blocks several others, remove the lowest-use item rather than forcing the load.
Should first-aid supplies be kept in a separate pouch?
A separate, clearly identified first-aid kit is usually easier to recognize and maintain than mixing supplies into a general electronics or tool pouch. Keep its contents appropriate to your needs and training, and check dates and condition separately.
Bottom line
Organize an EDC pouch by giving it one job, placing frequent items first, grouping related gear, and leaving enough space to retrieve everything cleanly. The pouch should make a work bag, truck, travel setup, or everyday carry easier to understand—not hide more stuff.
Start with the smallest useful load, run the two-minute access test, and remove anything that has no clear task. A good layout is easy to open, easy to reset, and easy to move without rebuilding your whole carry system.
Sources and further reading
- Carryology: Get Organized—Accessories to Help Tidy Your EDC Bag — practical guidance on access, cable control, modular organizers, and moving an organized setup between bags.
- Pack Config: Assembling an EDC Kit — a real compact-kit example showing how a main zipper, internal pockets, and a front pocket support access and organization.
- CobaltNook Tactical MOLLE Organizer Pouches — current product details for the main compartment, front zip pockets, webbing, set contents, and intended customer-loaded use referenced above.